Search
- 02 Apr 2025
- 4 Minutes to read
- DarkLight
- PDF
Search
- Updated on 02 Apr 2025
- 4 Minutes to read
- DarkLight
- PDF
Article summary
Did you find this summary helpful?
Thank you for your feedback!
A search window displayed at the top right of your screen allows you to search CDC items using free text. The advanced search option also guides you with context-sensitive filtering to help you quickly zoom in on specifics.

When you search, the search results can be saved, so that they can be worked with once the global search is opened again during the user session.
With search, you can:
• Search free form text throughout the CDC platform.
• Conduct an advanced search for specific items by one or more item types: Incident, Alert, Message and/or Observable. Once the type is selected, the Search window offers further context-sensitive filtering options, guiding you through the selections.
Simple Search
You can search any type of text characters throughout the CDC platform.
The search is not case-sensitive.
The search results are displayed below the search window in a multi-tab display, showing the number of resulting items, per type – Incidents, Alerts, Messages and Observables.
- Click the Search tab from the main menu.
- Enter the required text in the Search window.
- You must enter at least one character to activate the Search button.
- When searching incident names, complete words are required. However, a more general search term can be used to return information for the other items.
- You can use the Update button to view the most recent items, since the CDC platform is constantly refreshed every few minutes (depending on your system setup).
Click Search.
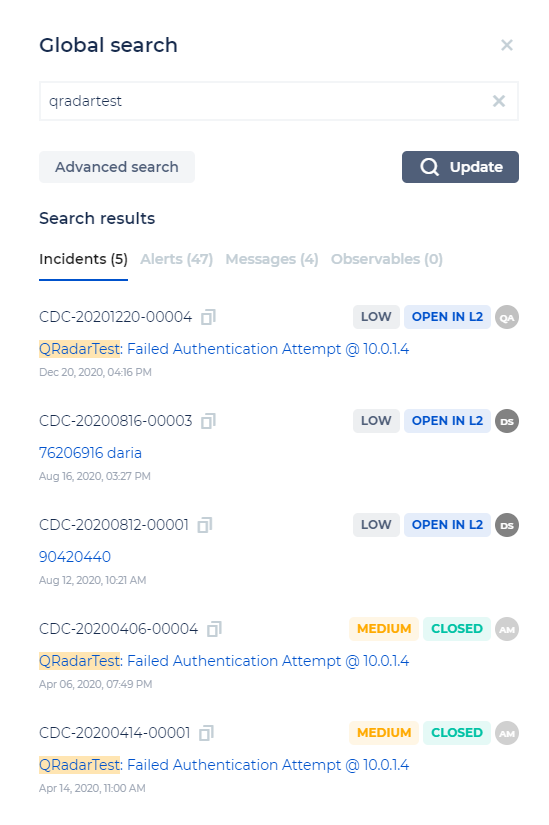
For example, the search string, qradartest, in the following screen capture, was found in 5 incidents, 47 alerts, and 4 messages, but not in any observables.
Clear the Search window to clear the search results or simply click the Search main menu tab.
Advanced Search
You can conduct an advanced search with more specified items. This search type is context-sensitive and will guide you through the relevant options as you select the required items to search.
All search results include links to their respective details page.
- Click the Search main menu tab to open the search window.
- Click Advanced search, located directly below the empty search window, to begin the search.
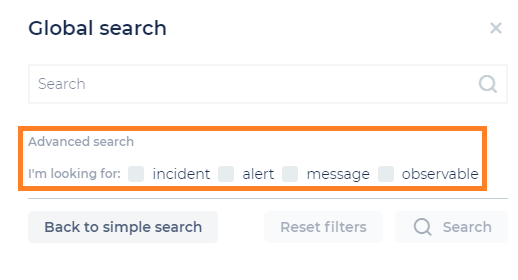
- Select the required search types: Incident, Alert, Message, and/or Observable. You can choose one or more types.
At any point in the advanced search, you can also:
- Return to the free text search by clicking the Back to simple search button.
- Clear all the currently selected filters by clicking the Reset filters button.
- Continue to search:
- Incident and/or Alert: by defining the filtering options.
- Messages and/or Observables: by free-text searching.
These advanced search options are context-sensitive. Therefore, depending on your selection, further options are available as you make your selections. For fields with multiple options, you can select more than one option at a time.
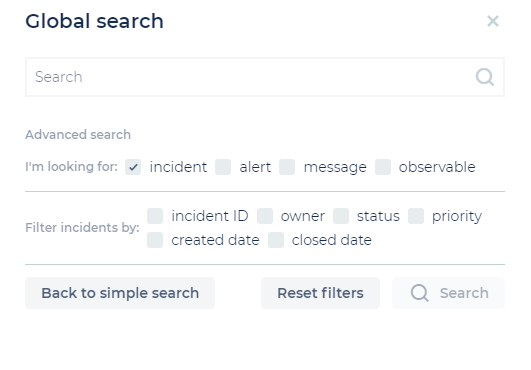
Continue to search Incidents by:
- Incident ID: Enter a specific and known Incident ID# to view its full details.
- Incident Owner: Select a known Incident Owner name from the drop-down list.
- Incident Status: Open, Pending. and/or Closed.
- Incident Priority: Low, Medium, High, Custom, and/or Critical.
- Incident Created Date: Define a date/time range for when the incident was originally created.
- Incident Closed Date: Define a date/time range for when the incident was closed.
Continue to search Alerts by:
- Alert Status: New, In Incident, Resolved, or Closed.
- Alert Detection Date: You can define a start/end date and time range.
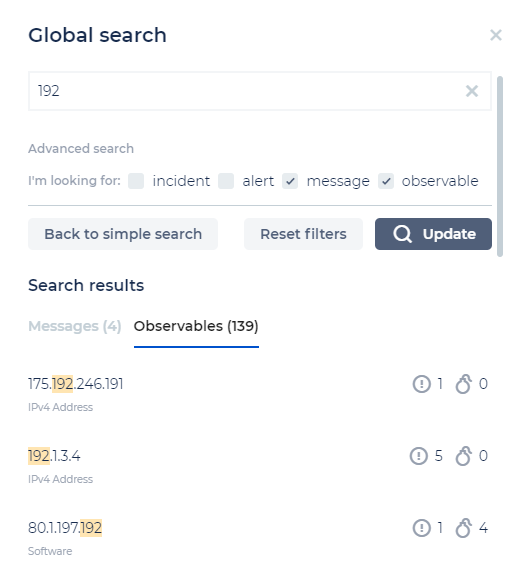
Continue to search Messages and Observables by entering text in the Search window above. In the example below, searching the string “192” returns 4 related Messages and 139 related Observables.
Note: For Observables – enter the Observable value rather than its type.
Populating Date Fields
Many search and filter options require defining a date and time both for the start date/time as well as for the end date/time.
There are a number of ways to populate these fields:
Enter the corresponding numbers for the exact date and time – from your keyboard in the From/To windows – in your system’s defined format:
Day/Month/Year Hour:Minute or Month/Day/Year Hour:Minute. (No defaults are defined).* Day Range: 1-31
* Month Range: 1-12
* Year Range: YYYY (4-digit format from 1900 to today)
* Hour Range: 00 – 24 or 00 – 12
* Minute Range: 00 – 59Today: While your cursor is in either the To window, or both the From and To windows - simply click the Today button to populate today’s date and the current time.
Dragging: Click in either the From/To window to show the calendar and drag your cursor across dates to select them.
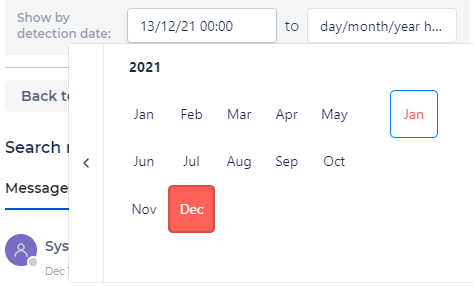
Click in either the From/To window to show the calendars and click a date to select. You can use the arrows to the left and right of the calendar for incrementing/decrementing the year and/or month. Alternatively, clicking on the year’s number or the month’s name will offer a range or list of years/months to select from. Clicking on the year and selecting the year will automatically advance to the month selection.
Was this article helpful?